Onboarding Guide: How to Register a Transferra Account
We’re excited to have you join our platform, and we’re here to guide you through the simple steps of registering a Transferra account. Transferra is a convenient and secure way to transfer money, make payments, and manage your finances effortlessly.
We’re excited to have you join our platform, and we’re here to guide you through the simple steps of registering a Transferra account. Transferra is a convenient and secure way to transfer money, make payments, and manage your finances effortlessly.
To get started, follow this step-by-step onboarding guide that will walk you through the registration process, ensuring you have everything you need to set up your account successfully. Whether you’re a seasoned user or new to online financial services, our intuitive interface will make the process smooth and hassle-free.
Registering
Step 1: Create a New User
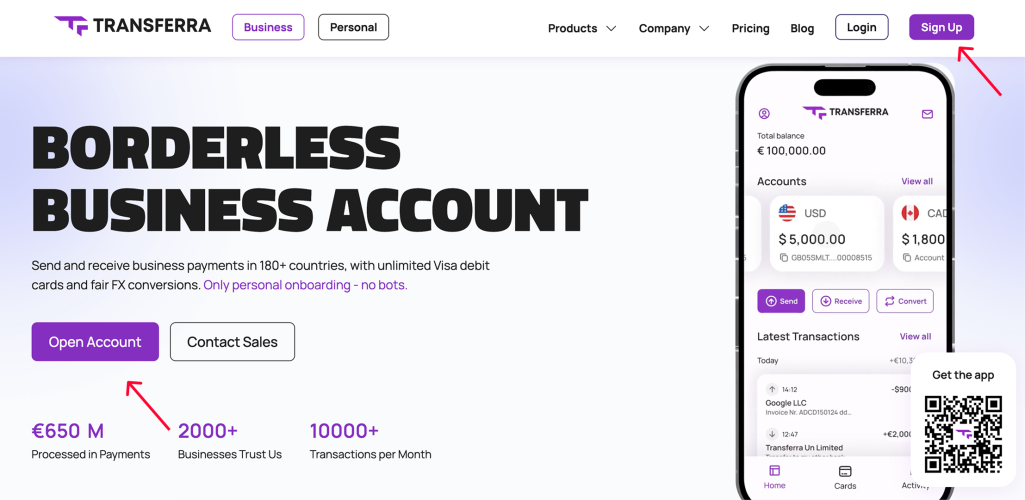
To create a user, you will only need your phone number and password. To start, follow the link or click on the menu in the upper right corner of the website and then click “Sign up”. If your screen is not wide enough, you will see the menu icon in the upper right corner of the screen. Open the menu and click “Sign up” button.
⠀⠀⠀⠀
A registration form will open. Enter your phone number and a password of your choice. The password must be 7 to 30 characters long and include at least one lower-case Latin letter, one upper-case Latin letter, numbers, and special symbols.
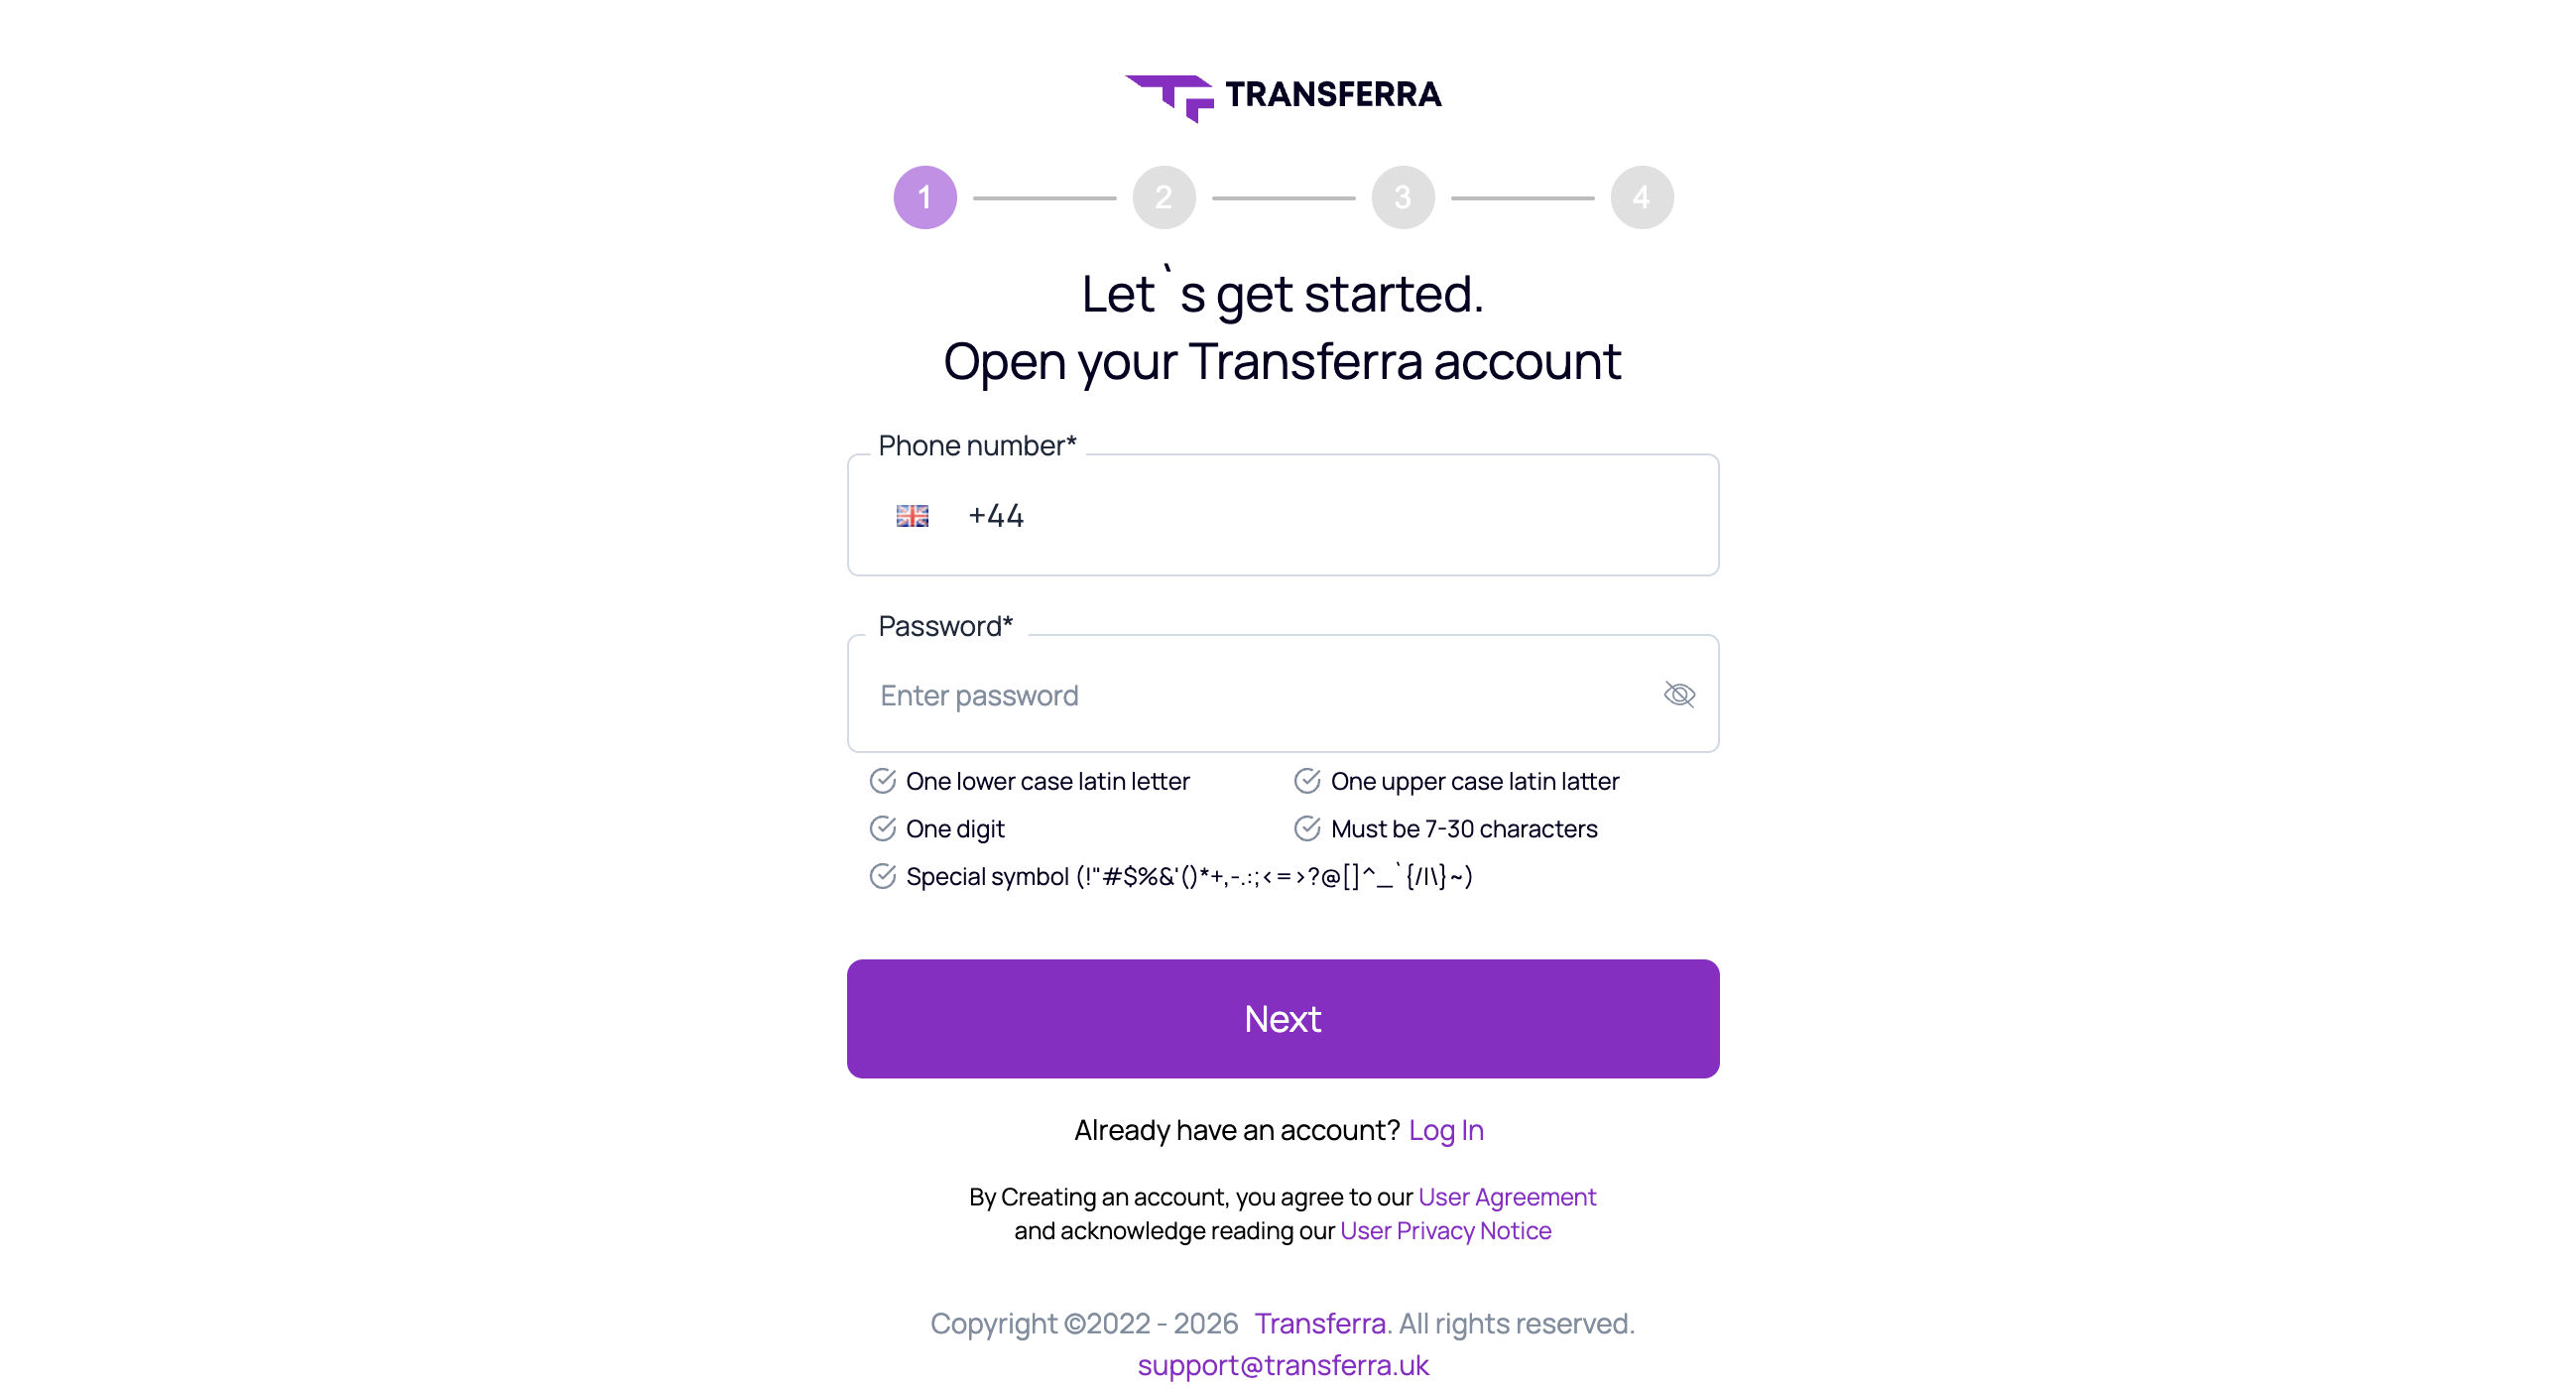
Click “Next”. You will receive a short message with a security code. Enter the security code in the form. The next page will open automatically.
If you close the application form by accident at this stage, there is no need to worry as your user has already been created. Simply log in using your credentials. On the dashboard, click the “Open an account” button to continue the onboarding process.
Note: Our system allows you to manage multiple accounts in one dashboard to simplify control over your accounts. Hence, the user you register at this step will be your only way to access all of your accounts.
Step 2: Choose a Business or an Individual Account
After you register the user, the next page will be displayed automatically, giving you the option to choose between creating an individual account or a business account. The business option will be chosen by default. If you would like to jump straight to Onboarding for Individuals, you will need to have an personal invitation code.
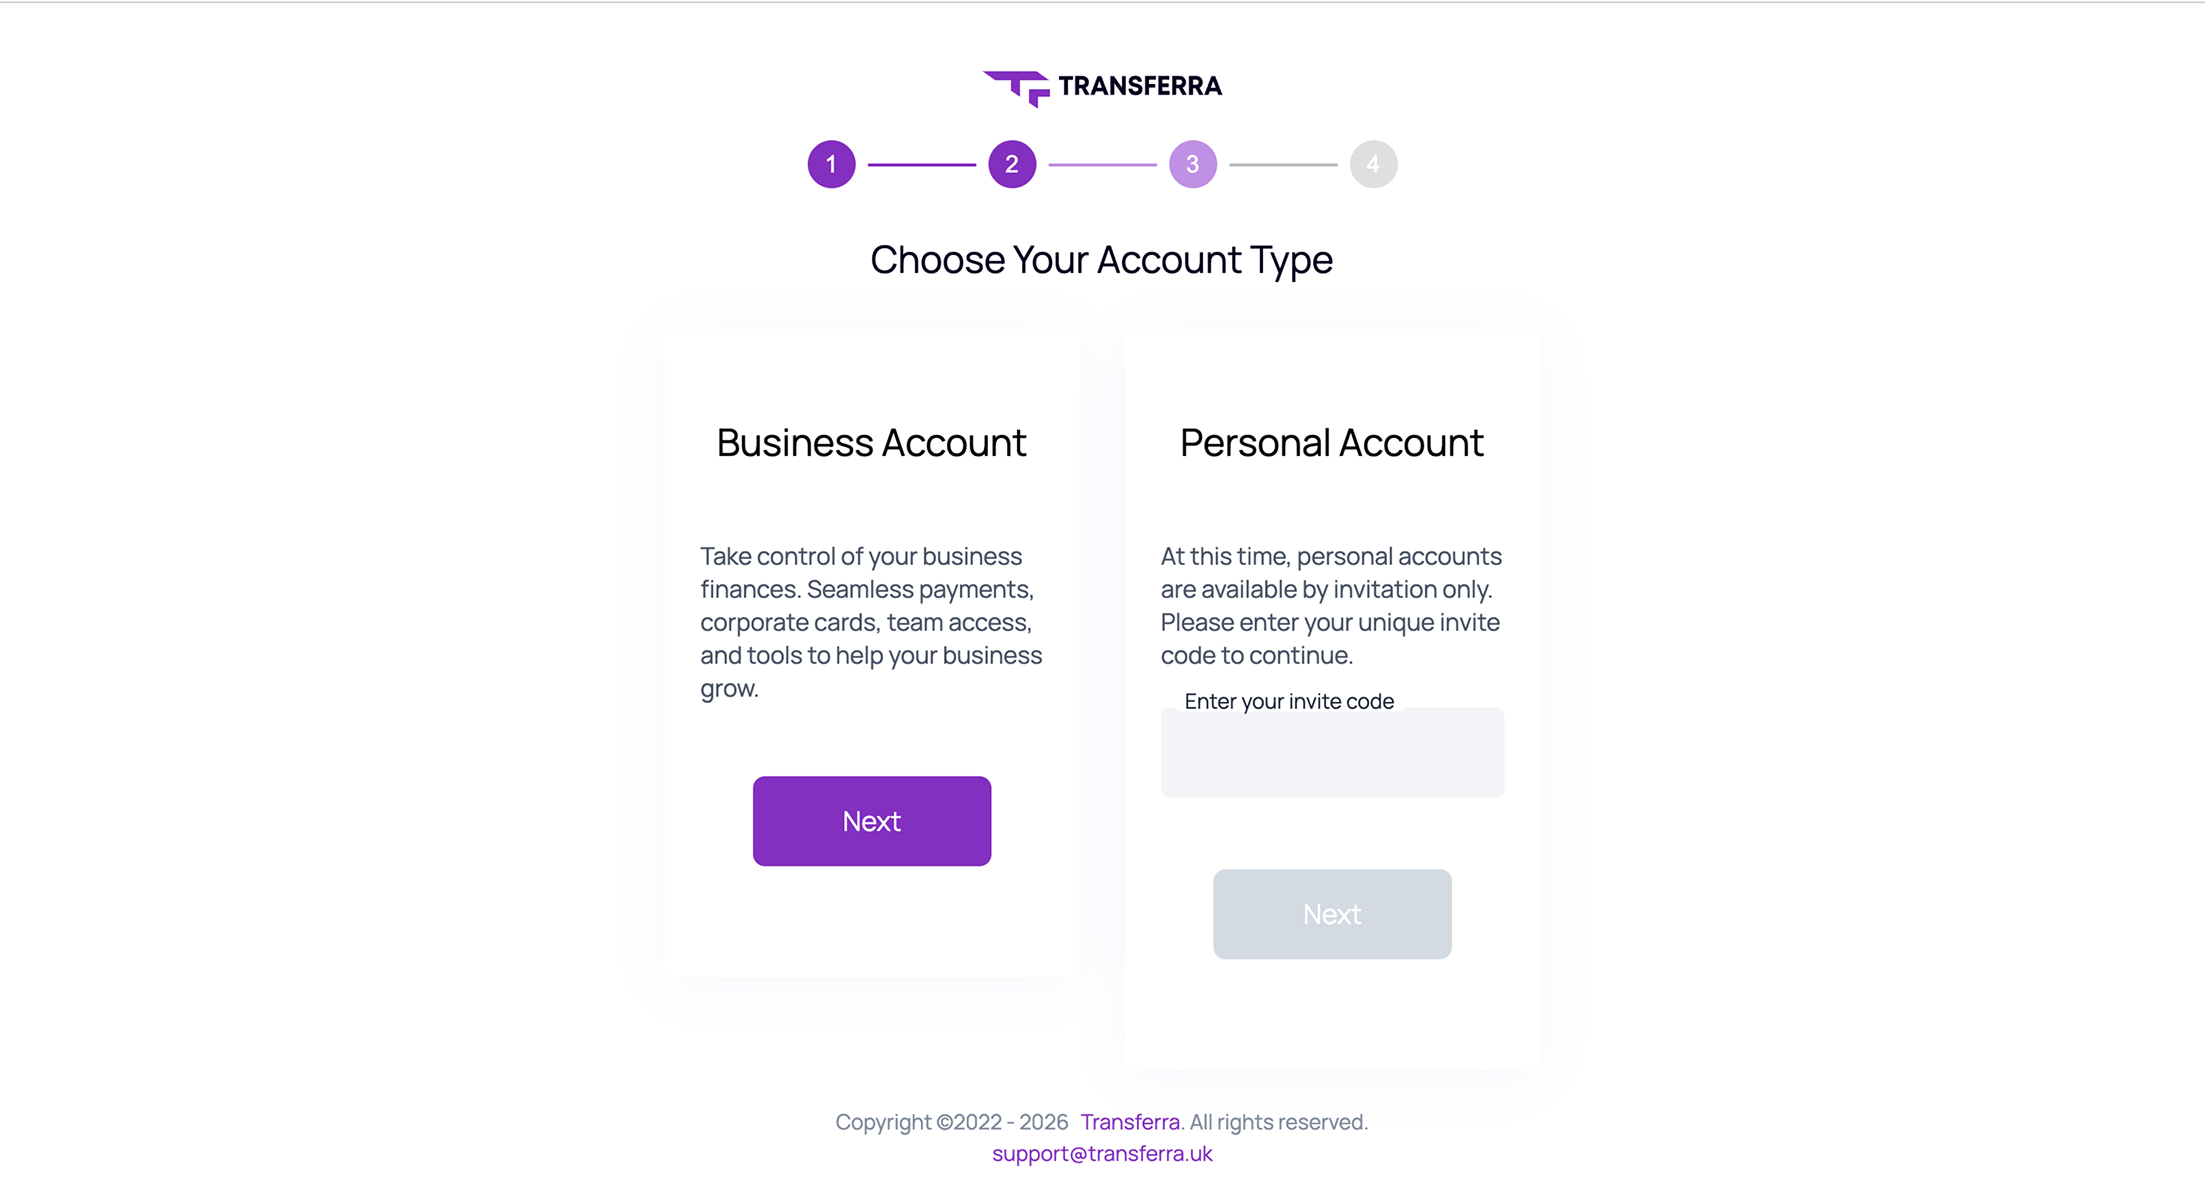
Note: Transferra offers an unlimited number of business accounts per user. You can apply for both individual and business accounts or multiple business accounts via the dashboard.
Step 3: Access the Dashboard
Once you have chosen the type of account, you will be asked to enter either your company name and corporate email address for a business account or your full name and private email address for an individual account.
Fill in the necessary information and click “Register.” You will receive a security code at the email address you provided. Enter the code, repeat the login, and enjoy your dashboard.
Onboarding for a Transferra Business Account
Once you have registered a new user, you can start the onboarding process. Open your dashboard. You should see two options to choose from: simple structure and standard structure. If the company’s director is the same person as UBO (owner of the company), then choose Simple Structure. Otherwise, please choose Standard Structure.
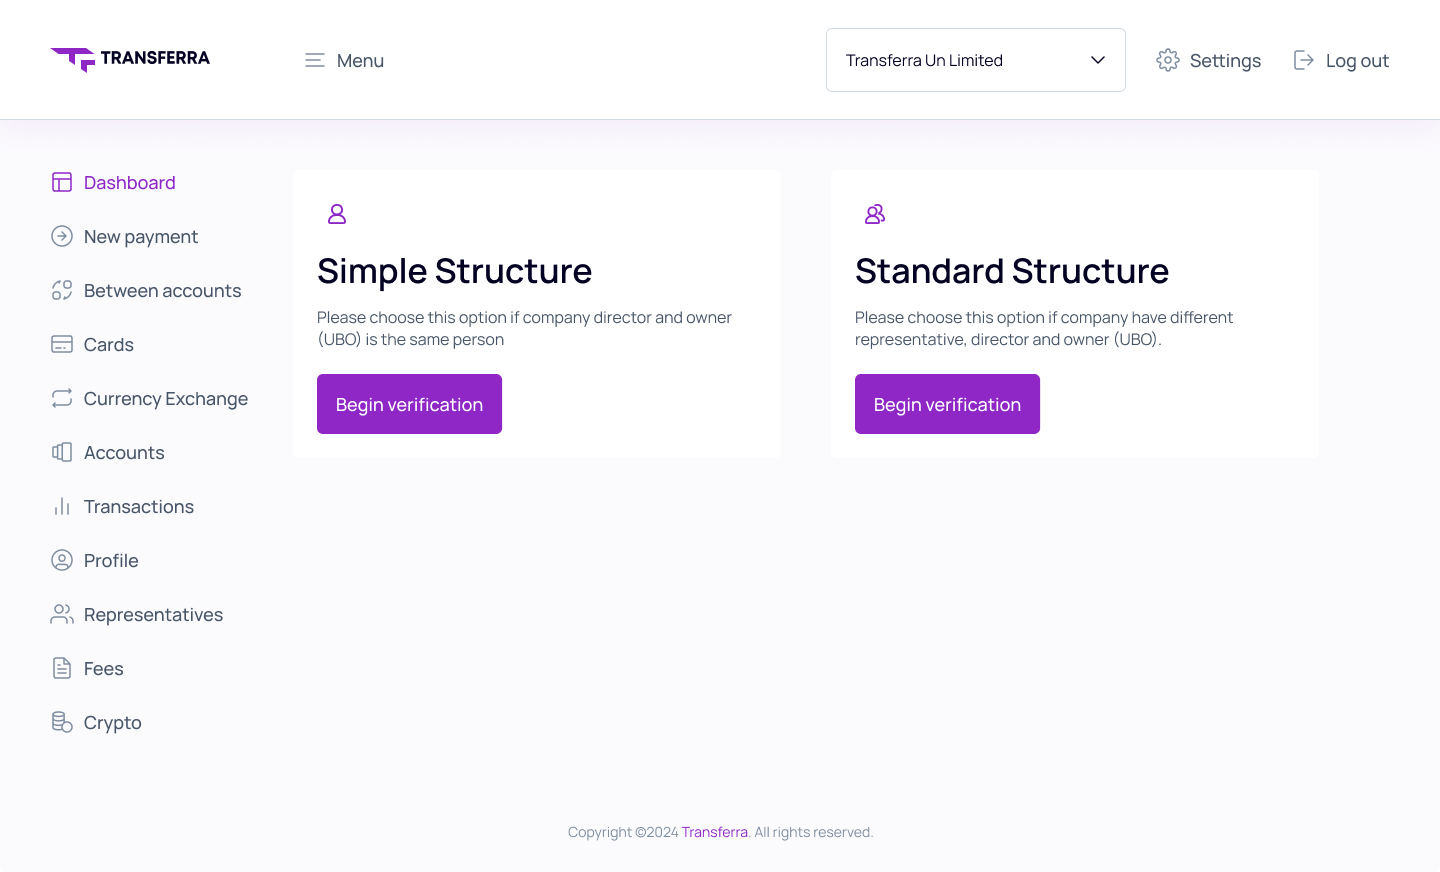
⠀⠀⠀⠀To start a business account onboarding, choose between simple and standard structure options in your dashboard, ensuring the company’s director is the same as the owner.
Simple Structure
⠀⠀⠀⠀
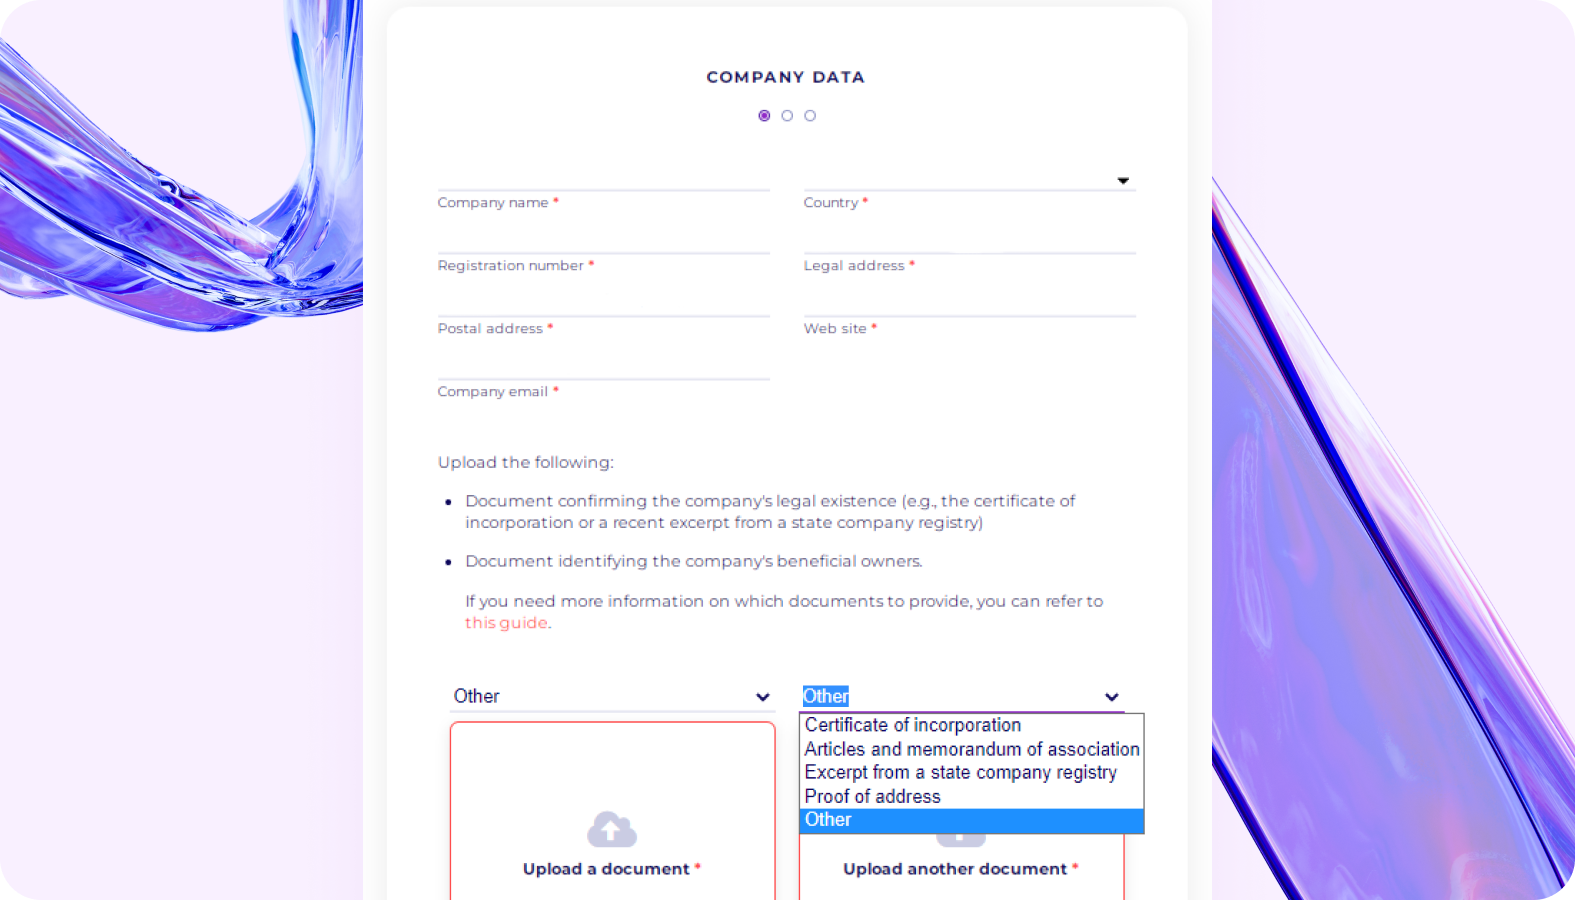
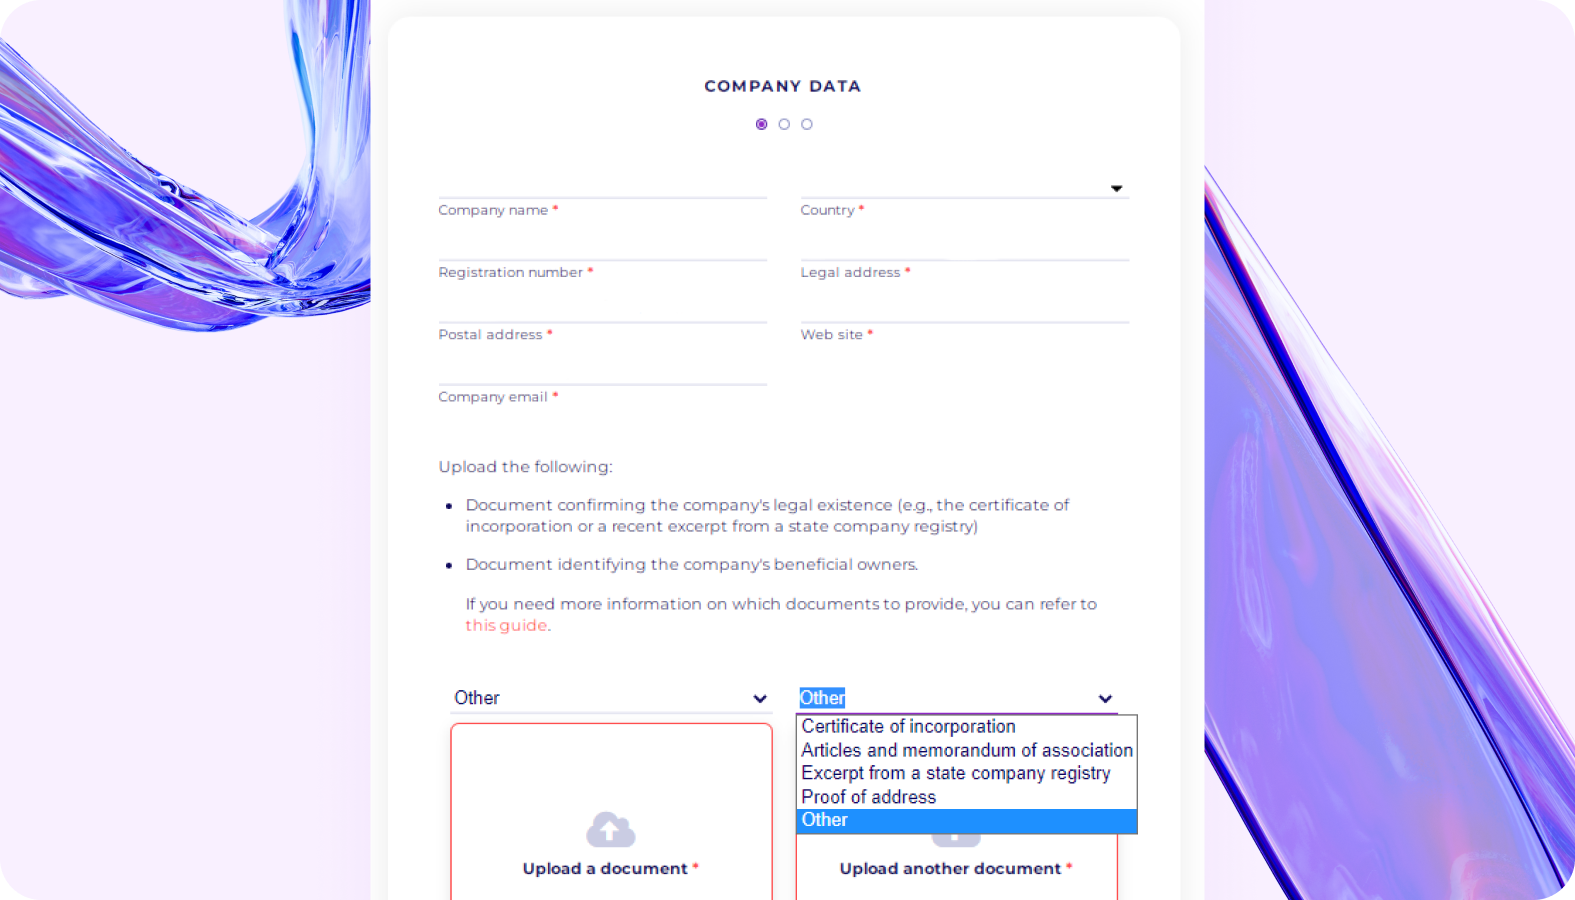
Add company data
First, you will need to fill out the corporate account application. It usually takes less than 10 minutes to complete. The application form includes questions about your company, its finances, and your partners.
⠀⠀⠀⠀
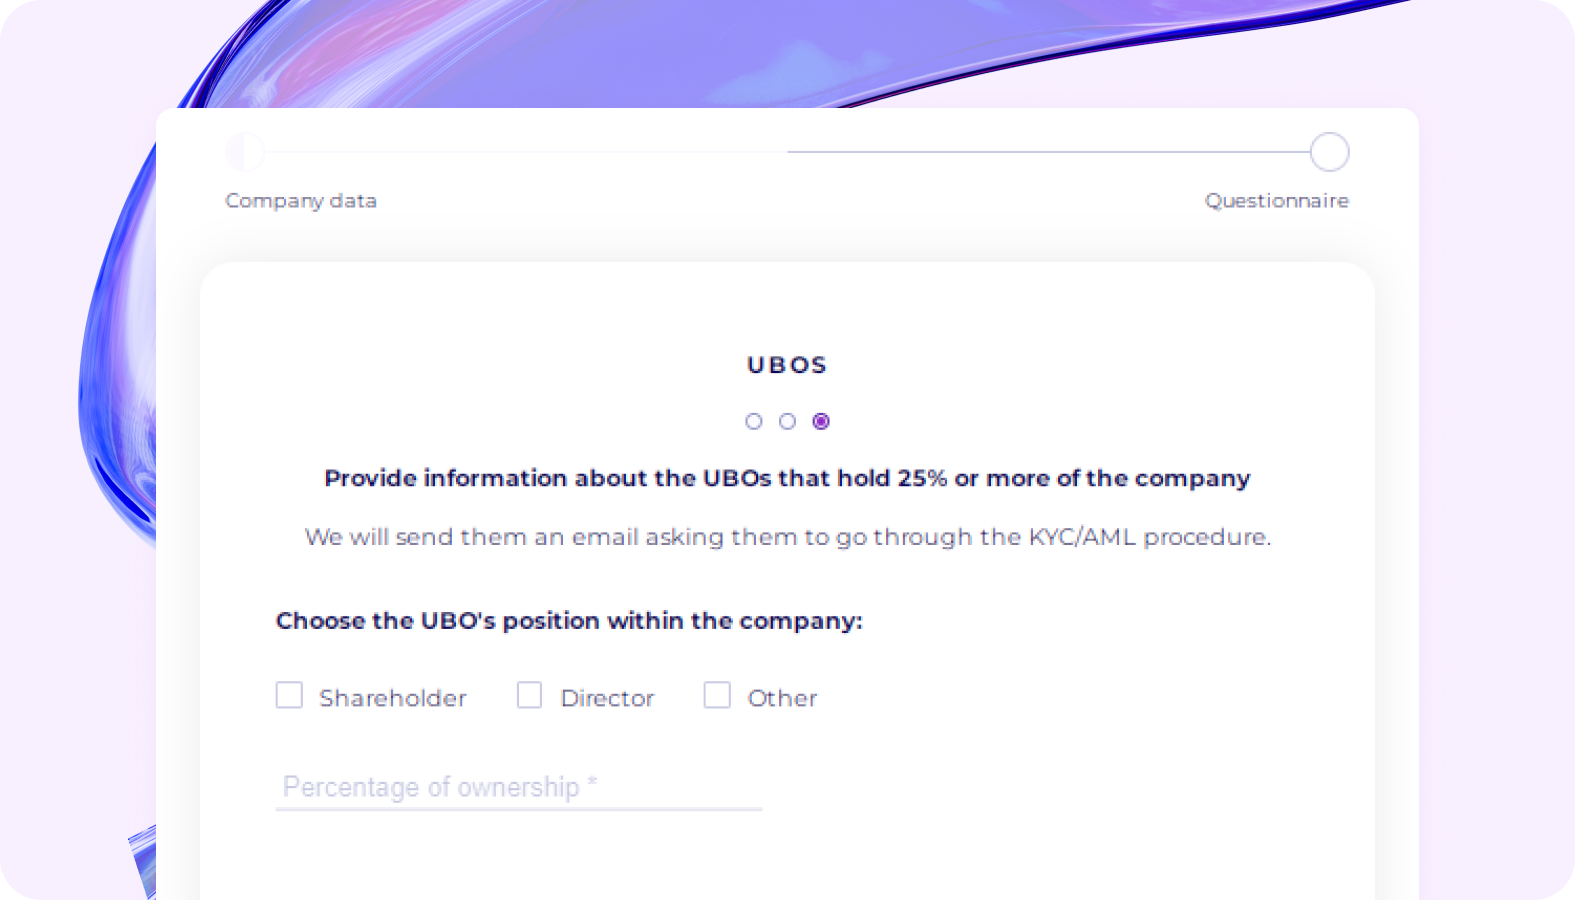
Add UBO data
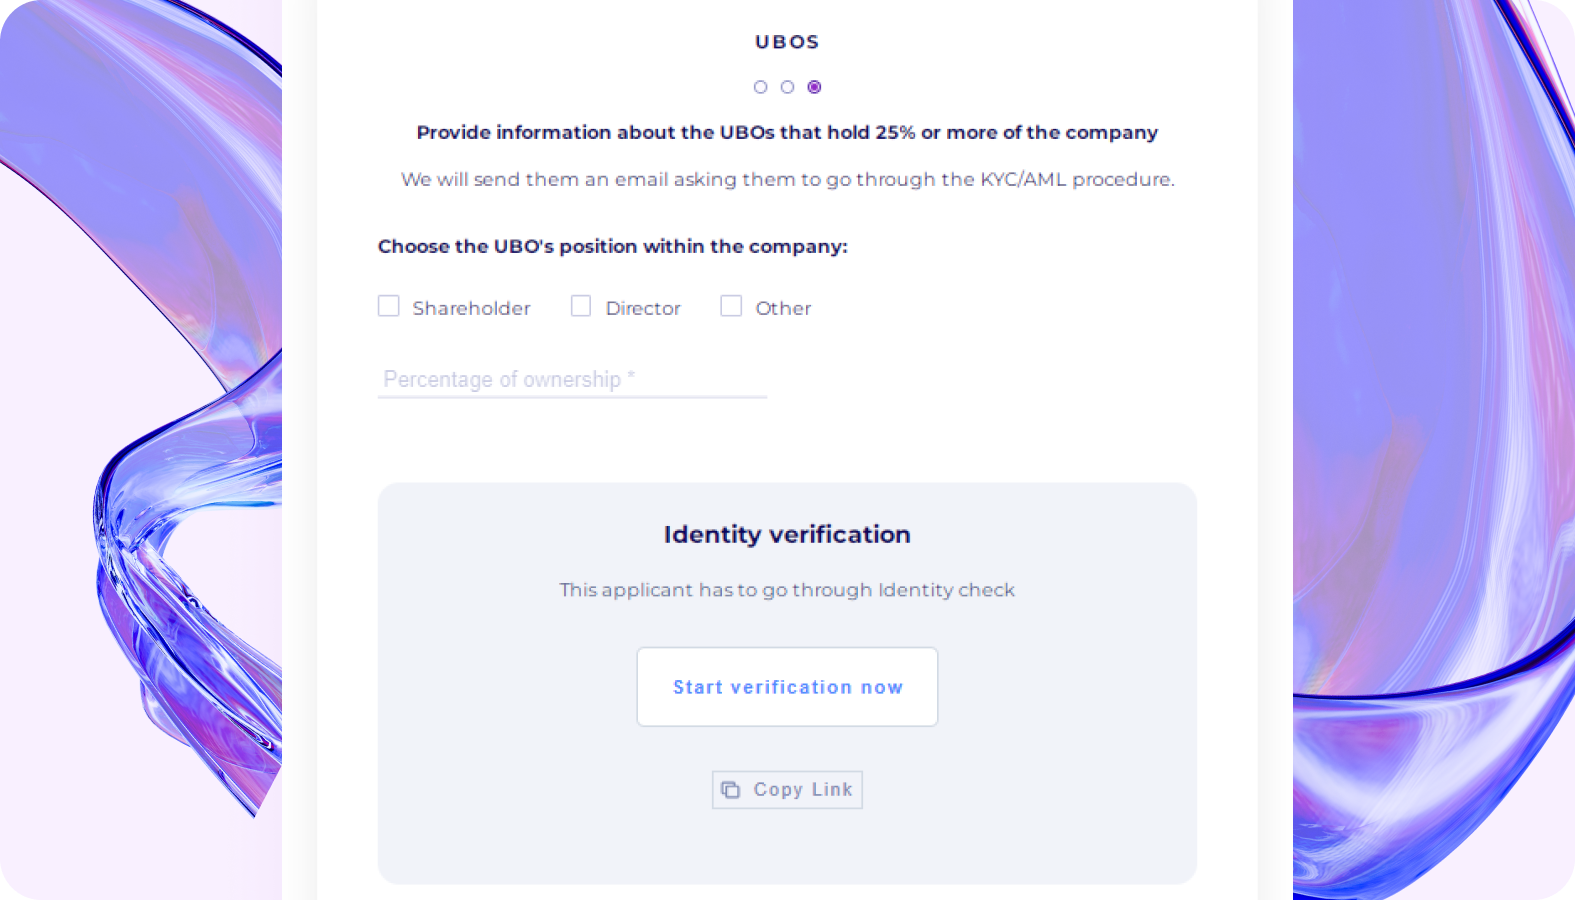
Next, you will need to add data about UBOs that hold 25% or more of the company. For that, choose one of three options to specify the position that the UBO holds within your company: shareholder, director, or other. If you choose “Other,” an extra field will pop out for you to specify the position of the UBO in the company. You will also need to enter the percentage of ownership.
⠀⠀⠀⠀
Verify the UBO
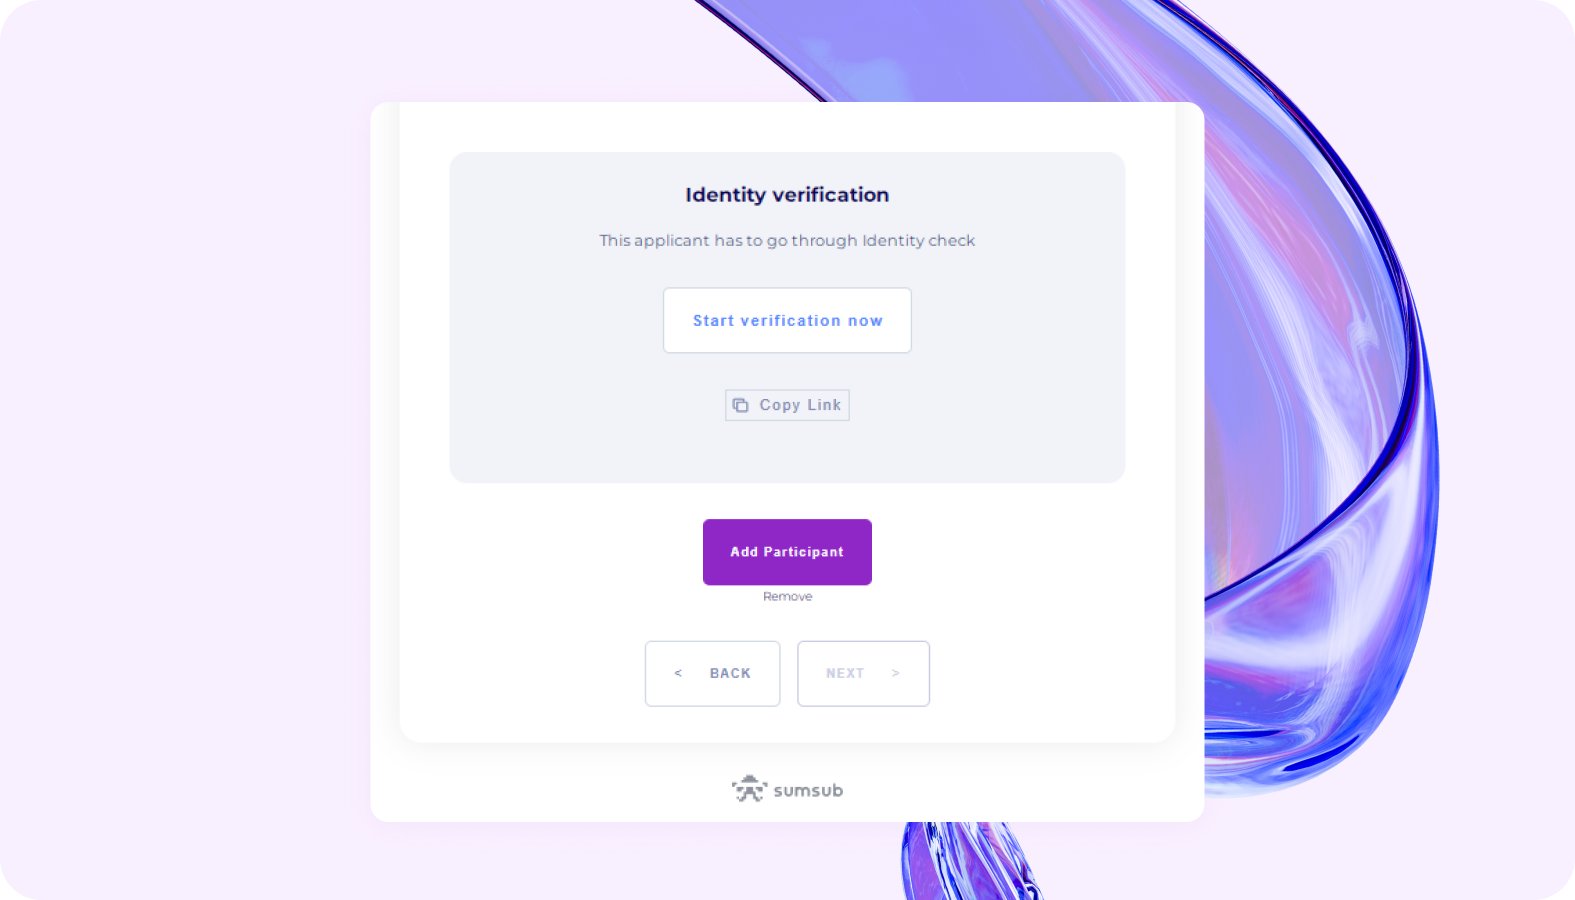
After that, the UBO should pass the identity verification. Once all of the above has been completed, click “Add Participant” to actually add your UBO to the application form.
If there are more UBOs in the company, click “Add another Add another Shareholder / Representative / UBO” and repeat the process described above.
See the “Verification Process for UBO” section to learn more about the verification process.
⠀⠀⠀⠀
Submit the application
Once all the information is provided, you will see a summary of your application. Please check all the details and click the “Submit” button to finalise the application. If you need to make corrections, it is possible to go back to every step of the application process.
After that, we will confirm that we have received your application via email from our client manager. If there are any issues or if we need additional information, our client manager will inform you as well.
Standard Structure
⠀⠀⠀⠀
Add company data
First, you will need to fill out the corporate account application. It usually takes less than 10 minutes to complete. The application form includes questions about your company, its finances, and your partners.
Once you are done with this section, proceed to the next one. In the next section, you will need to provide company data and two corporate documents. Please choose the type of document first and then upload it.
⠀⠀⠀⠀
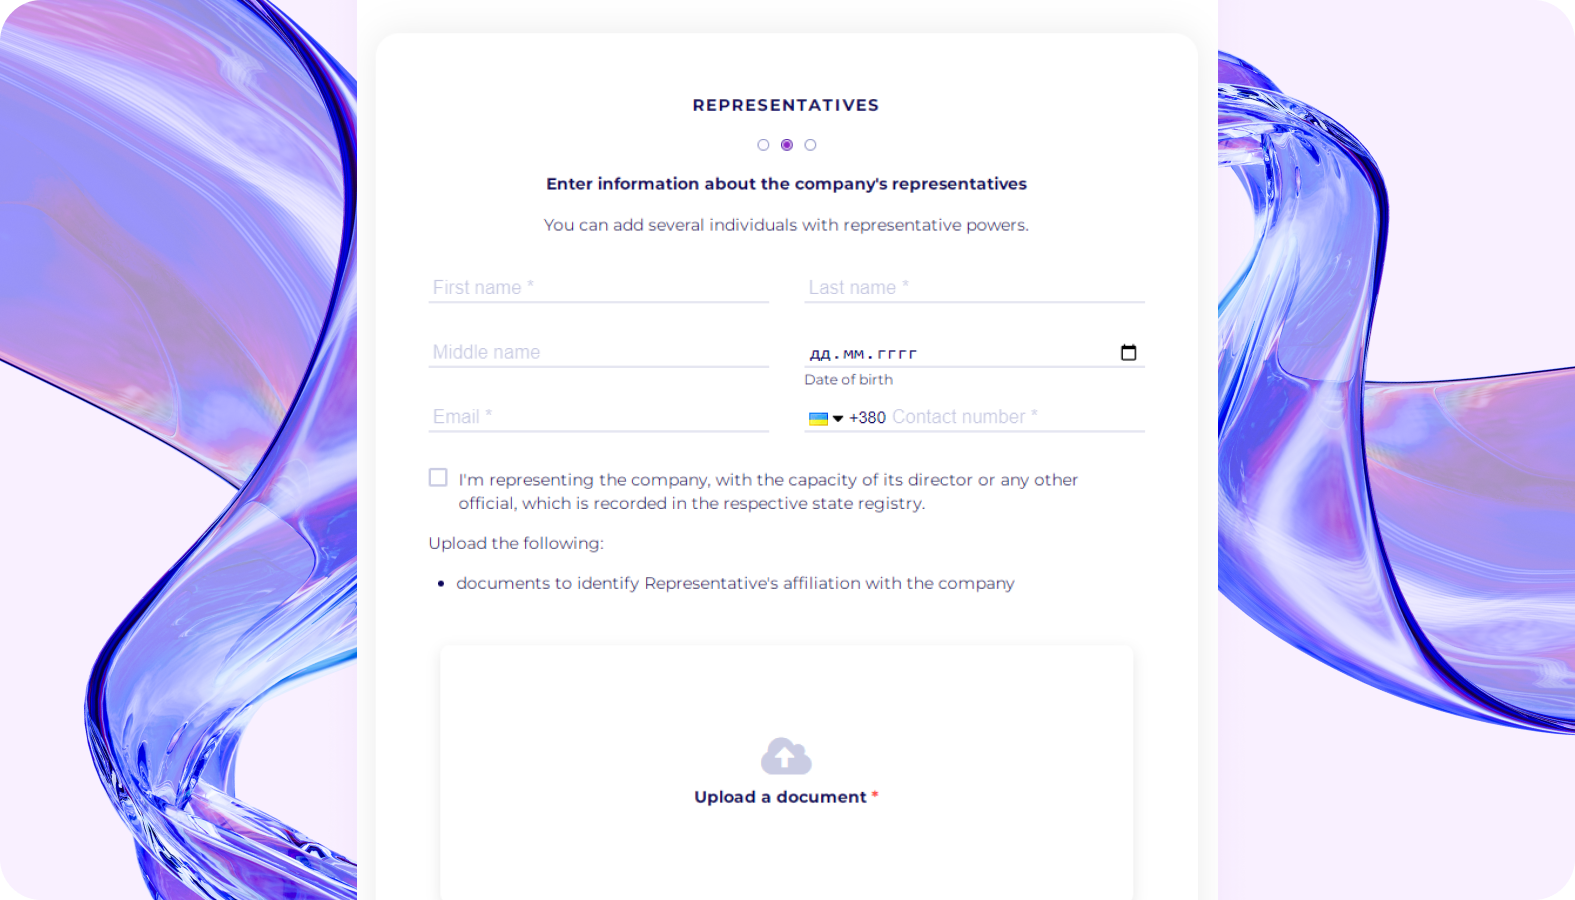
Add representatives’ data
Next, you will need to add data about representatives of your company, which includes their personal and contact information.
If a representative is the company’s director, please check the box under the “Email” field. Otherwise, you will need to provide a document proving that the mentioned representative has legal rights to represent your company.
⠀⠀⠀⠀
Verify representatives
The final step for the representative is to pass the verification.
If you are the company’s representative, click the “Start verification now” button. It will open a verification window in a new tab.

If you are filling out an onboarding form on behalf of another representative, then you can either send the link to verification via email or copy the link and send it to the representative via any other secured communication channel.
When all the details are entered and the link has been sent to the corresponding person, click “Add Participant” to actually add your representative to the application form.
If there are more representatives in the company, please click “Add another Shareholder / Representative / UBO” and repeat the process described above.

See the “Verification Process for Representatives” section to learn more about the verification process.
Add the UBO data
The final step is to provide details about the UBOs that hold 25% or more of the company. For that, choose one of three options to specify the position that the UBO holds within your company: shareholder, director, or other. If you choose “Other,” an extra field will pop out for you to specify the position of the UBO in the company.
Next, enter the percentage of ownership that the mentioned UBO holds.
⠀⠀⠀⠀
Verify the UBO
After that, the UBO should pass the identity verification. Once all of the above has been completed, click “Add Participant” to actually add your UBO to the application form.
If there are more UBOs in the company, click “Add another Shareholder / Representative / UBO” and repeat the process described above.
See the “Verification Process for UBO” section to learn more about the verification process.
⠀⠀⠀⠀
Submit the application
Once all the information is provided, you will see a summary of your application. Please check all the details and click the “Submit” button to finalise the application. If you need to make corrections, it is possible to go back to every step of the application process.
After that, we will confirm that we have received your application via email from our client manager. If there are any issues or if we need additional information, our client manager will inform you as well.
Onboarding for Individual Transferra Accounts
Once you have registered a new user, open your dashboard and choose the Individual Account option. To start, click the “Begin verification” button on the dashboard.
The first step is the questionnaire, where you will need to answer several simple financial questions and fill in all the necessary fields.
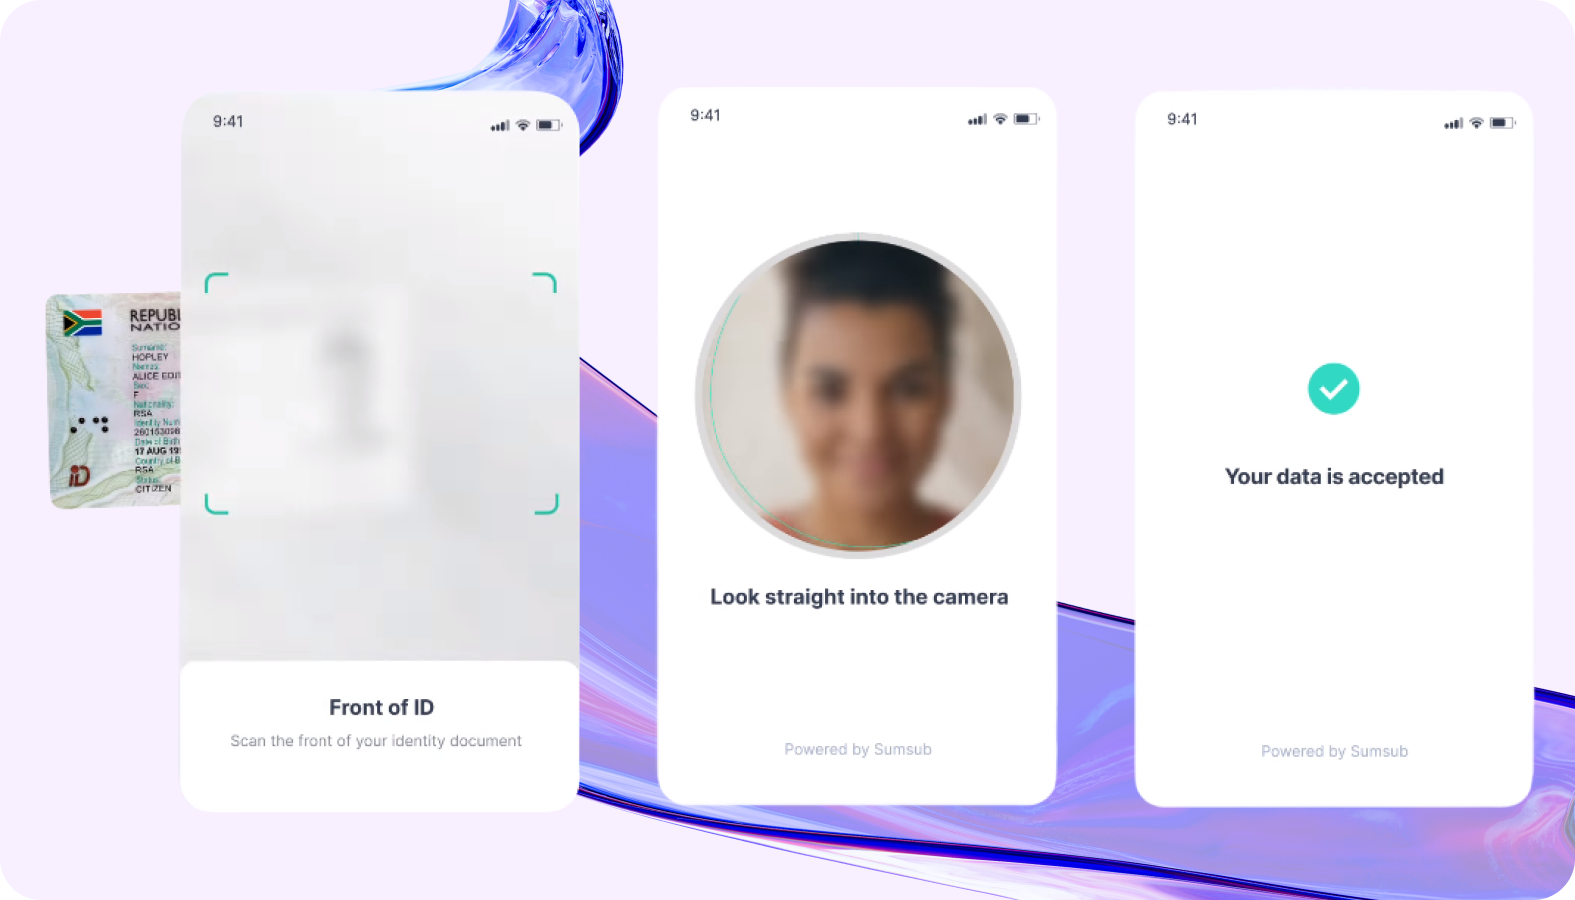
In the next section, you will need to provide your person’s identifying documentation. It can be a passport or an ID card. Choose the country that your document was issued by and upload it.
After that, you will need to upload your proof of residence. The list of acceptable and unacceptable documents will be available above the upload field.
The last step of our onboarding process is a selfie. You will need to spin your head once in front of your camera, as shown in the animated example.

Once all the information is provided, you will see a summary of your application. Please check all the details and click the “Submit” button to finalise the application. If you need to make corrections, it is possible to go back to every step of the application process except for the selfie part.
After that, we will confirm that we have received your application via email from our client manager. If there are any issues or if we need additional information, our client manager will inform you as well.
Verification Process for Representatives
Note: Please remember that we don’t accept scanned documents during verification. It should be either a clear photo or the original PDF version of the document, not cropped or cut.
The verification process for representatives is straightforward as it consists of the following four sections:
- Questionnaire. The first part of verification is a small questionnaire for representatives that includes two questions: the PEP status of your close associates or yourself, and whether you have a U.S. person status or not.
- Identity document. Here, you will need to choose the issuing country of your valid identity document, choose its type, and upload it as a photo. We accept ID cards, passports, and residence permits.
- Proof of address. In this section, we expect you to upload your proof of address, e.g., a utility bill, bank statement, etc.
- Selfie. Follow the instructions on the screen to successfully pass the selfie stage.
Verification Process for UBO
Note: Please remember that we don’t accept scanned documents during verification. It should be either a clear photo or an original PDF version of the document, not cropped or cut.
The verification process for UBO is straightforward as it consists of the following four sections:
- Questionnaire. The first part of verification is a questionnaire for UBOs. In addition, you will need to upload UBO’s CV (mandatory) and proof of wealth (optional). If there are any issues or you have any questions, please contact us at support@transferra.uk.
- Identity document. Here, you will need to choose the issuing country of your valid identity document, choose its type, and upload it as a photo. We accept ID cards, passports, and residence permits.
- Proof of address. In this section, we expect you to upload your proof of address, e.g., a utility bill, bank statement, etc. Lists of acceptable and unacceptable documents will also be displayed for you to check.
- Selfie (applicable only for Simple Structure). Follow the instructions on the screen to successfully pass the selfie stage.
The above-mentioned verification process takes only a couple of minutes if all the documents are in hand.
Apply for Multiple Business Accounts
Transferra offers an unlimited number of business accounts per user. Even if your current application has not been approved yet, you are still eligible to submit more applications for other companies. For that, click on your company name at the top of the dashboard. The list of accounts that are available for you will pop out. At the bottom of that list, you will see the “Open an account” button. Click on it and apply for a new account following the above instructions.